Add Css/Jquery Fixed Horizontal Bill Of Fare To Blogger Blog
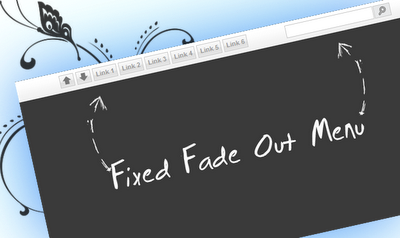
This navigation bar made amongst CSS & jQuery gets semi-transparent when y'all scroll downward the page too is slightly showing upward past times fading out gradually becoming close transparent. When the user hovers over it, the card becomes opaque again.
Inside the navigation nosotros convey around links, a search input too transcend & bottom buttons making it easier for the user to navigate to the transcend or bottom of the page.
If y'all desire to add together this horizontal card amongst CSS/jQuery to a Blogger blog, follow the steps below:
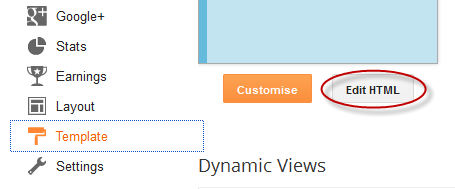
1. Log into your Blogger job concern human relationship too choose your blog, too then live out to "Template" too press the "Edit HTML" button.
2. Click anywhere within the code expanse too search using CTRL + F keys, this tag:
6. Finally, search for the next tag:
Credit: Tympanus. This card was inspired past times David Walsh's transcend navigation bar.
Inside the navigation nosotros convey around links, a search input too transcend & bottom buttons making it easier for the user to navigate to the transcend or bottom of the page.
If y'all desire to add together this horizontal card amongst CSS/jQuery to a Blogger blog, follow the steps below:
1. Log into your Blogger job concern human relationship too choose your blog, too then live out to "Template" too press the "Edit HTML" button.
2. Click anywhere within the code expanse too search using CTRL + F keys, this tag:
</head>3. Just above/before the </head> tag, add together the next scripts too CSS code for the jQuery menu:
<style type="text/css">#nav{height:35px;border-bottom:1px corporation #ddd;position:fixed;top:0;left:0;right:0;background:#fff url(https://blogger.googleusercontent.com/img/b/R29vZ2xl/AVvXsEhVFU07oMoLViIe-yUGJDDMbRkdEaKJ_-9eFJPSOW_QhE7rIhyk-9Yc3nTp0G_5oEjwn1Cdy9zF9qQlQ-mQ3kiLP8sUBD5Vl76AQK4G0VYjLzXPxNXR6LTgRN-_FwYIdowu2gBIyXKyIX52/s1600/navbar.png) repeat-x centre left;z-index:999999}#nav ul{height:25px;list-style:none;margin:6px automobile 0;width:600px}#nav ul li{display:inline;float:left;margin:0 2px}#nav a{font-size:11px;font-weight:700;float:left;padding:2px 4px;color:#999;text-decoration:none;border:1px corporation #ccc;cursor:pointer;background:transparent url(https://blogger.googleusercontent.com/img/b/R29vZ2xl/AVvXsEi2diF_9mj2US1de-svRuvkMG-6xfHA27n3axDYNG_FpctdkROYCOfM2FeLwjza86Qad-iXwWx2panWT6w2vzoPi7oOjrA2shndHqcWhbEAWf5SSGdQkZlM4MZLxUBr0tvGDjRUcb0-ohO_/s1600/overlay.png) repeat-x centre left;height:16px;line-height:16px}#nav a:hover{background-color:#D9D9DA;color:#fff}#nav a.top span,#nav a.bottom span{float:left;width:16px;height:16px}#nav a.top span{background:transparent url(https://blogger.googleusercontent.com/img/b/R29vZ2xl/AVvXsEitSeS5l6Uc0YKw-amHXv4Z96GQmSPer5eS6XgDWVbr16baGP-xZJ3vzCuGgeIOsLQjebOUTfwYtdv1aHx67cxdiI6-aI7H3kNu5RiNLAkA6Lp28c3Kttp-lie74RkaBlCHxUoDAKSxZyXZ/s1600/top.png) no-repeat centre center}#nav a.bottom span{background:transparent url(https://blogger.googleusercontent.com/img/b/R29vZ2xl/AVvXsEi5MKZpfYChyphenhyphenzswqdWsiKncB51361TwkXLpTM6fuWH1vl1Bw-0uvYBfhO-0PBdXuEswmJPjNxEjgQxb1PR0SrJgXALzbIgZDagB1BUhO5sy50hyphenhyphengGaNCFPq14FuT5xvwk_7O-HSCZ5Z1QAi/s1600/bottom.png) no-repeat centre center}#nav ul li.search{float:right}#nav input[type="text"]{float:left;border:1px corporation #ccc;margin:0 1px 0 50px;padding:2px;line-height:16px}input.searchbutton{border:1px corporation #ccc;padding:1px;cursor:pointer;width:26px;line-height:16px;background:#E8E9EA url(https://blogger.googleusercontent.com/img/b/R29vZ2xl/AVvXsEicOrHgwlCcZXvo7Flu2wXUFPMdg6JuGwW4s5T1JipodAaOiVlZpYgZ5EqJiQ5rQidAuqxWTi7haxtd_e4YplZwSZ8qLZp4dNGAleVzpVT1mLH8jgbLX_v-RJriaDV16QhmYHZEIgCGiEv6/s1600/search.png) no-repeat centre center}input.searchbutton:hover{background-color:#D9D9DA}</style>4. Next, search for this tag:
<script type="text/javascript" src="https://code.jquery.com/jquery-1.3.2.min.js"></script>
<script type="text/javascript">//<![CDATA[
$(function(){$(window).scroll(function(){var a=$(window).scrollTop();0!=a?$("#nav").stop().animate({opacity:"0.2"},400):$("#nav").stop().animate({opacity:"1"},400)}),$("#nav").hover(function(a){var b=$(window).scrollTop();0!=b&&$("#nav").stop().animate({opacity:"1"},400)},function(a){var b=$(window).scrollTop();0!=b&&$("#nav").stop().animate({opacity:"0.2"},400)})});//]]></script>
<body>If y'all can't notice it, search for this one:
<body expr:class='"loading" + data:blog.mobileClass'>5. Just below/after this code, re-create too glue the HTML construction of the menu:
<div id="nav">Note: Replace URL address amongst the URL of your pages too Link 1, 2, 3, 4, 5, 6 amongst the link championship that volition exhibit inwards the menu.
<ul>
<li><a class="top" href="#top"><span></span></a></li>
<li><a class="bottom" href="#bottom"><span></span></a></li>
<li><a href='URL address'><span>Link 1</span></a></li>
<li><a href='URL address'><span>Link 2</span></a></li>
<li><a href='URL address'><span>Link 3</span></a></li>
<li><a href='URL address'><span>Link 4</span></a></li>
<li><a href='URL address'><span>Link 5</span></a></li>
<li><a href='URL address'><span>Link 6</span></a></li>
<li class="search">
<form method="get" action="/search">
<input name="q" type="text" placeholder="Search..."/><input type="submit" value="" class="searchbutton"/>
</form>
</li>
</ul>
</div>
<div id="top"></div>
6. Finally, search for the next tag:
</body>Just higher upward the </body> tag, add together the next HTML code:
<div id="bottom"></div>7. Click the "Save Template" push clit too you're done adding the menu. Enjoy!
Credit: Tympanus. This card was inspired past times David Walsh's transcend navigation bar.


