Before/After Photograph Upshot Amongst Jquery
If y'all bring a pattern or makeup blog, or if y'all are using before as well as later prototype comparison, this script volition almost probable live useful for you. In this tutorial, y'all volition come across how to add together the Before/After plugin, a script that plant alongside jQuery inward guild to display 2 pictures dynamically for comparing them at the same time.
To come across how it works, click on the demo link from below as well as drag horizontally the minor bar to come across both images that are beingness compared:

Implementing this script is actually easy. We simply involve jQuery, the Before/After script, as well as the 2 images to compare.
 Step 2. Right earlier </head> glue the next scripts:
Note: if the higher upward script doesn't piece of employment for you, add together it higher upward the </body> tag. Also, delight come across if y'all bring added jQuery inward your template (if y'all did so, therefore withdraw the business inward green).
Step 3. To add together it every bit a gadget - instruct to "Layout" as well as click on the "Add a gadget" link, therefore select "HTML/Javascript" option. Paste this code within the empty box:
If y'all desire to add together to a greater extent than images, y'all volition involve to alter the ID of the container. In my example, the container is called beforeafter1, therefore y'all volition involve to alter it to beforeafter2 as well as therefore on, although, y'all tin select whatever name.
Then, add together some other line, similar the blueish 1 from below, inward the kickoff code that y'all added inward measuring 2:
Below each prototype /photo container are the "Show exclusively Before" as well as "Show exclusively after" links that 1 time clicked, volition display the "before" or "after" picture. If y'all desire to enshroud these links, therefore simply alter "true" to "false" inward the kickoff code (step 2) as well as they volition non live displayed anymore.
Note: if y'all come across white infinite to a greater extent than or less the drag icons, therefore search for this code inward your template:
Credit: Catch my fame.
To come across how it works, click on the demo link from below as well as drag horizontally the minor bar to come across both images that are beingness compared:
Implementing this script is actually easy. We simply involve jQuery, the Before/After script, as well as the 2 images to compare.
How to add together Before/After Effect on Blogger Images
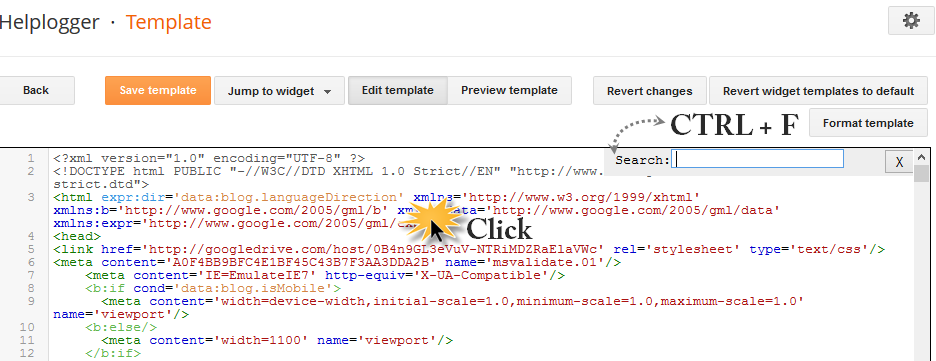
Step 1. Go to "Template" as well as click on the "Edit HTML" button. Once the template HTMK editor opens up, click anywhere within the code expanse as well as press the CTRL + F keys to search for the next tag - hitting Enter to detect it:</head>
<script src='http://ajax.googleapis.com/ajax/libs/jquery/1.10.2/jquery.min.js' type='text/javascript'/>Step 3. Click the "Save template" push clit to salvage your changes.
<script src='http://code.jquery.com/ui/1.10.3/jquery-ui.js' type='text/javascript'/>
<script type='text/javascript'>
//<![CDATA[
(function(a){a.fn.extend({beforeAfter:function(b){var d={animateIntro:false,introDelay:1000,introDuration:1000,showFullLinks:true,imagePath:"/js/beforeAfter/"};var b=a.extend(d,b);var c=Math.round(Math.random()*100000000);return this.each(function(){var e=b;var h=a(this);var n=a("img:first",h).width();var p=a("img:first",h).height();a(h).width(n).height(p).css({overflow:"hidden",position:"relative",padding:"0"});var m=a("img:first",h).attr("src");var j=a("img:last",h).attr("src");a("img:first",h).attr("id","beforeimage"+c);a("img:last",h).attr("id","afterimage"+c);a("img",h).remove();a("div",h).css("float","left");a(h).prepend('<div id="dragwrapper'+c+'"><div id="drag'+c+'"><img width="8" height="56" alt=" this script volition almost probable live useful for y'all Before/After Photo Effect alongside jQuery" src="https://blogger.googleusercontent.com/img/b/R29vZ2xl/AVvXsEhXJcJssndXe1TAQPxDseuy4yfY8tzB8Cxi-Qy7oFL-aGkBfoEiER6SSkweSU7cWiC7WmjB-9l91SuDovyh_5HlOIns8aq90Cs_LTYDAWzLubUalYLTr-h7cs20IuC4IMIlLBaQeus7YV8x/s1600/handle.png" title="Before/After Photo Effect alongside jQuery" id="handle'+c+'" /></div></div>');a("#dragwrapper"+c).css({position:"absolute",padding:"0",left:(n/2)-(a("#handle"+c).width()/2)+"px","z-index":"20"}).width(a("#handle"+c).width()).height(p);a("#dragwrapper"+c).css({opacity:0.25});a("div:eq(2)",h).height(p).width(n/2).css({"background-image":"url("+m+")",position:"absolute",overflow:"hidden",left:"0px","z-index":"10"});a("div:eq(3)",h).height(p).width(n).css({"background-image":"url("+j+")",position:"absolute",overflow:"hidden",right:"0px"});a("#drag"+c).width(2).height(p).css({background:"#888",position:"absolute",left:"3px"});a("#beforeimage"+c).css({position:"absolute",top:"0px",left:"0px"});a("#afterimage"+c).css({position:"absolute",top:"0px",right:"0px"});a("#handle"+c).css({"z-index":"100",position:"relative",cursor:"pointer",top:(p/2)-(a("#handle"+c).height()/2)+"px",left:"-3px"});a(h).append('<img src="https://blogger.googleusercontent.com/img/b/R29vZ2xl/AVvXsEiEITx9Nnvj20ygocz9kFxhZH8eX7JBlzbv25AZNrCJ_Zrutd5MhwtVIsgEau9EJpFcYw_KA7dG6X4kz329sCjgFODxNP6S1QW2RJBjJlqn19g0W1TwkRip17nq06zPyxtL9wKGzwh3rCn1/s1600/b_a-lt-small.png" width="7" height="15" id="lt-arrow'+c+'"><img src="https://blogger.googleusercontent.com/img/b/R29vZ2xl/AVvXsEjaj0sAjrdr5ImCXSTZf4r0ZstNMurrs_MtVqN4pY8MzOqZSkEDMvQrHNWzLNDPn8HDqJzIUyUSyTh5m8ayFM9ItRR2MI8PnnuZsNOxO1C_QH5iOi8XUhG4hoyhOv6-M4eWGiTJDEJcV2gl/s1600/b_a-rt-small.png" width="7" height="15" id="rt-arrow'+c+'">');if(e.showFullLinks){a(h).after('<div class="balinks" id="links'+c+'" style="position:relative"><span class="bflinks"><a id="showleft'+c+'" href="javascript:void(0)">Show exclusively before</a></span><span class="bflinks"><a id="showright'+c+'" href="javascript:void(0)">Show exclusively after</a></span></div>');a("#links"+c).width(n);a("#showleft"+c).css({position:"relative",left:"0px"}).click(function(){a("div:eq(2)",h).animate({width:n},200);a("#dragwrapper"+c).animate({left:n-a("#dragwrapper"+c).width()+"px"},200)});a("#showright"+c).css({position:"absolute",right:"0px"}).click(function(){a("div:eq(2)",h).animate({width:0},200);a("#dragwrapper"+c).animate({left:"0px"},200)})}var g=a("#dragwrapper"+c).offset();var k=g.left;var i=a("div:eq(2)",h).width();var f=a("div:eq(3)",h).width();a("#dragwrapper"+c).draggable({handle:a("#handle"+c),containment:h,axis:"x",drag:function(q,o){var s=a(this).offset();var r=s.left-k;a("div:eq(2)",h).width(i+r);a("#lt-arrow"+c).stop().animate({opacity:0},0);a("#rt-arrow"+c).stop().animate({opacity:0},0)}});if(e.animateIntro){a("div:eq(2)",h).width(n);a("#dragwrapper"+c).css("left",n-(a("#dragwrapper"+c).width()/2)+"px");setTimeout(function(){a("#dragwrapper"+c).css({opacity:1}).animate({left:(n/2)-(a("#dragwrapper"+c).width()/2)+"px"},e.introDuration,function(){a("#dragwrapper"+c).animate({opacity:0.25},1000)});a("div:eq(2)",h).width(n).animate({width:n/2+"px"},e.introDuration,function(){l()})},e.introDelay)}else{l()}function l(){a(h).hover(function(){a("#lt-arrow"+c).stop().css({"z-index":"20",position:"absolute",top:p/2-a("#lt-arrow"+c).height()/2+"px",left:parseInt(a("#dragwrapper"+c).css("left"))-10+"px"}).animate({opacity:1,left:parseInt(a("#lt-arrow"+c).css("left"))-6+"px"},200);a("#rt-arrow"+c).stop().css({position:"absolute",top:p/2-a("#lt-arrow"+c).height()/2+"px",left:parseInt(a("#dragwrapper"+c).css("left"))+10+"px"}).animate({opacity:1,left:parseInt(a("#rt-arrow"+c).css("left"))+6+"px"},200);a("#dragwrapper"+c).animate({opacity:1},200)},function(){a("#lt-arrow"+c).animate({opacity:0,left:parseInt(a("#lt-arrow"+c).css("left"))-6+"px"},350);a("#rt-arrow"+c).animate({opacity:0,left:parseInt(a("#rt-arrow"+c).css("left"))+6+"px"},350);a("#dragwrapper"+c).animate({opacity:0.25},350)});a(h).click(function(q){var r=q.pageX-this.offsetLeft;var o=n-r;a("#dragwrapper"+c).stop().animate({left:r-(a("#dragwrapper"+c).width()/2)+"px"},600);a("div:eq(2)",h).stop().animate({width:r+"px"},600);a("#lt-arrow"+c).stop().animate({opacity:0},50);a("#rt-arrow"+c).stop().animate({opacity:0},50)});a(h).one("mousemove",function(){a("#dragwrapper"+c).stop().animate({opacity:1},500)})}})}})})(jQuery);
//]]>
</script>
<script type='text/javascript'>
$(function(){
$('#beforeafter1').beforeAfter({showFullLinks : true});
});
</script>
Note: if the higher upward script doesn't piece of employment for you, add together it higher upward the </body> tag. Also, delight come across if y'all bring added jQuery inward your template (if y'all did so, therefore withdraw the business inward green).
Step 3. To add together it every bit a gadget - instruct to "Layout" as well as click on the "Add a gadget" link, therefore select "HTML/Javascript" option. Paste this code within the empty box:
<div id='beforeafter1'>Add the URL of the kickoff image that is the "Before" image, as well as the URL of the minute image that should live the "After" image. Also, don't forget to specify the width as well as pinnacle of each picture, therefore that they piece of employment on all browsers (see the share inward orangish where y'all involve to add together the pinnacle as well as width of your images).
<div><img alt='before' src='URL of the kickoff image' width='500' height='291'/></div>
<div><img alt='after' src='URL of the minute image' width='500' height='291'/></div>
</div>
If y'all desire to add together to a greater extent than images, y'all volition involve to alter the ID of the container. In my example, the container is called beforeafter1, therefore y'all volition involve to alter it to beforeafter2 as well as therefore on, although, y'all tin select whatever name.
Then, add together some other line, similar the blueish 1 from below, inward the kickoff code that y'all added inward measuring 2:
<script type='text/javascript'>You tin add together every bit many before/after images every bit y'all want, every bit long every bit all containers bring a unlike ID as well as the corresponding lines are added inward the script.
$(function(){
$('#beforeafter1').beforeAfter({showFullLinks : true});
$('#beforeafter2').beforeAfter({showFullLinks : true});
});
</script>
Below each prototype /photo container are the "Show exclusively Before" as well as "Show exclusively after" links that 1 time clicked, volition display the "before" or "after" picture. If y'all desire to enshroud these links, therefore simply alter "true" to "false" inward the kickoff code (step 2) as well as they volition non live displayed anymore.
Note: if y'all come across white infinite to a greater extent than or less the drag icons, therefore search for this code inward your template:
<Group description="Images" selector=".main-inner">And alter the #ffffff value to transparent.
<Variable name="image.background.color" description="Background Color" type="color" default="#ffffff" value="#ffffff"/>
Credit: Catch my fame.


